FTTC (up to 80Mb), FTTP (up to 1GB), Leased lines, VoIP from £6/ month, Security software, Office 365, Email etc.
When you need value for money and quality of service without the drama phone 028 8283 1111
Select a quick link > Control panel - Rise a ticket - Remote assistance
ZoiPer set up on Android
Step by step, how to download and instal ZoiPer V5 on your Android phone.
Pre requisites
Before starting, you will need the following;
- VoIP username
- VoIP password
- SIP Domain
Contact Megganet or your manager if you need these. For security reasons, we do not send passwords and what the password is for, in the same message. We usually send you your username and SIP domain by email and can send you your password to your registered mobile phone by TXT or WhatsApp.
You will need a reasonable internet speed to be able to use ZoiPer.
If you have any difficulty with this, please phone me.
Step 1 – First, open the Google play store and search for ZoiPer. Download and install the ZoiPer app as shown below.
Step 2 – Select ‘Open‘ to start ZoiPer.
Step 3 – You will be asked to ‘Allow ZoiPer to send notifications? – select ‘Allow‘. then select ‘Agree & Continue‘ on the main screen as in the pic below.
Step 4 – Ignore the free trial and select ‘Skip‘ on the top right.
Step 5 – Select ‘YES‘ here as we are setting up the free version of the software.
Step 6 – Enter the VoIP username here. In this example, my username is ‘columz2‘. Your username will be different. Your password will have been sent to you by TXT or your manager will have set it for you on the control panel. Once you have entered your username and password, select ‘Create an account‘.
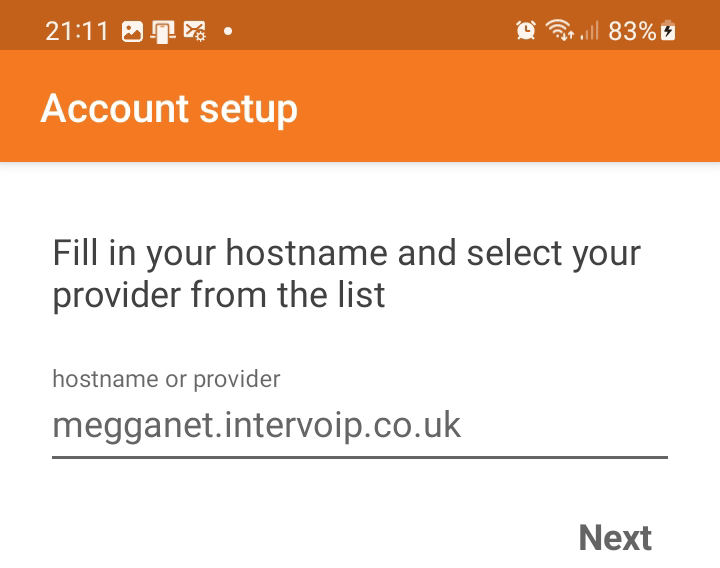
Step 7 – Enter your hostname in this section. Our hostname is ‘megganet.intervoip.co.uk‘, yours will have been sent to you and it will be different. When finished, select ‘Next‘.
Step 8 – You will get a popup warning you about a ‘Wrong hostname…’ and asking you ‘Do you want to continue?‘. Select ‘Use anyway‘.
Step 9 – Levee the following screen blank and select ‘Skip‘
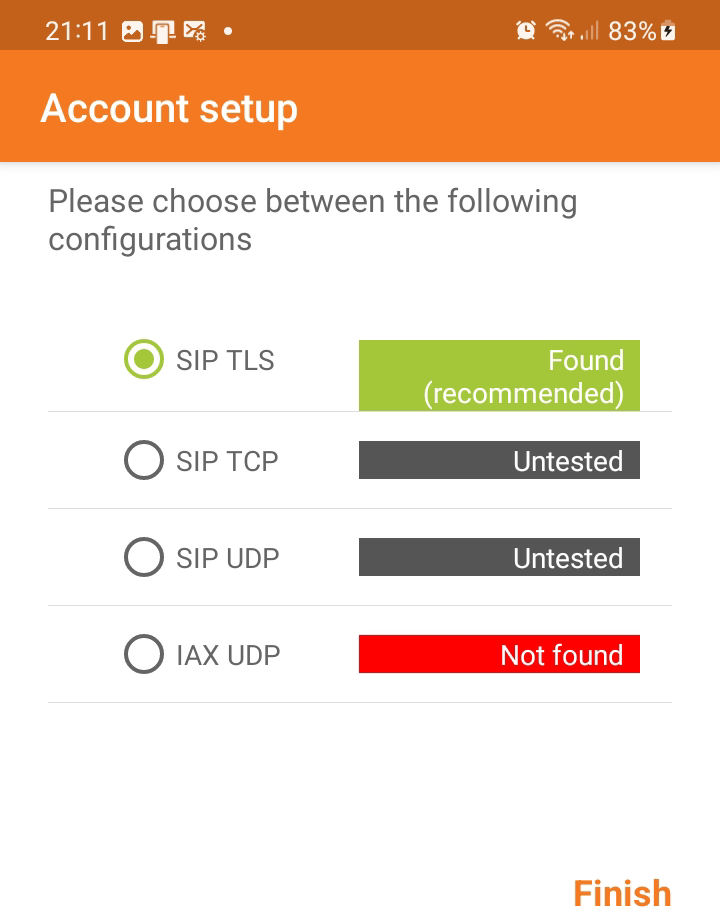
Step 10 – Once you get this far, you have successfully set up your VoIP account. Select ‘Finish’ to proceed.
Step 11 – You will be asked to allow ZoiPer to make and receive calls’, select allow. You may also be asked about ‘Do not Disturb Access’, Select ‘OK‘.
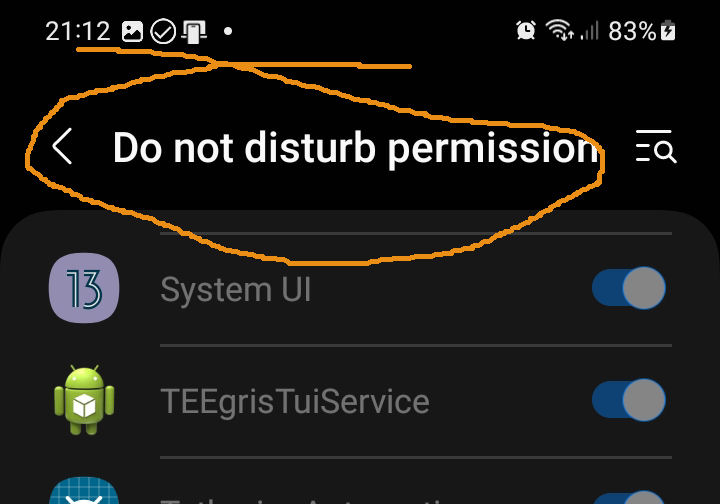
Step 12 – Scroll down to ZoiPer at the bottom of the list and turn on the required permission. Once selected,select ‘Allow‘ so that ZoiPer is not interrupted by your phones other chimes and sounds while you are on a call.
Step 13 – When done, click on the ‘< Do not disturb permission‘ link as in the pic below.
Step 14 – You can select ‘Turn on’ to allow ZoiPer to read your contacts so you can use them to speed dial them.
Setp 15 – After this you can ‘Add a favourite‘ (or more) if you wish.
That’s basically it, after this you should be able to make and receive calls using ZoiPer. Please do test by both making an outgoing call and an incoming call.
Updated, tested and verified on 20/3/23