FTTC (up to 80Mb), FTTP (up to 1GB), Leased lines, VoIP from £6/ month, Security software, Office 365, Email etc.
When you need value for money and quality of service without the drama phone 028 8283 1111
Select a quick link > Control panel - Rise a ticket - Remote assistance
Draytek ‘Smart VPN Client’ installation on a PC
Full set of instructions for the end user to use to connect their PC to a network behind a Draytek router using VPN.
Prerequisites
- The WAN IP address (or DDNS/ domain name) of the Draytek you are connecting to.
- The username for the connection.
- The password for the connection.
Also, please verify that your IT person has configured and tested the VPN in advance. This cuts down the chances of failure to connect.
In this example, we will be using an SSL tunnel for the VPN connection.
Before starting, exit all applications on your computer.
Download the Draytek ‘Smart VPN Client’ software
The ‘Smart VPN Client’ software is Draytek’s own secure connection software used to connect your device to a Draytek router. Draytek have made this software free to download and use.
Go to https://www.draytek.com/products/smart-vpn-client/ and download the appropriate ‘Smart VPN Client’ software.
In this example, the current version of the ‘Smart VPN Client’ VPN is 5.7.0. The current version number may be higher.

Once downloaded, open the downloads folder as shown below. If this icon is not available, just go to your Downloads folder manually.

The ‘Smart VPN client’ is downloaded as a compressed file and needs to be decompressed. Right mouse click on the ‘Smaart VPN Client’ software as below and select ‘Extract All…’ as shown below.
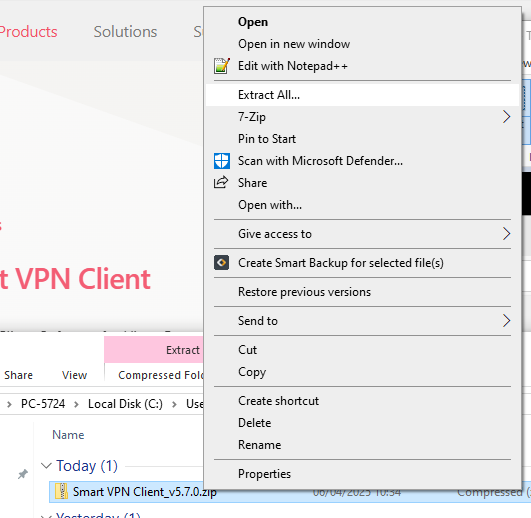
On my computer, this is the folder that the ‘Smart VPN Client’ will be decompressed to. – on your computer, it may be slightly different.

Next, enter the ‘Smart VPN Client’ folder by double clicking on it.

Next, start the installation by double clicking ‘SmartVPNClient_5.7.0’. Please note your version number may be different and the .exe at the end may not be visible on your computer.
This is the installer running below. Click ‘Next’ to continue.

Select the components to install. Levee the selection as is and click ‘Next’ to continue.

Choose the install location as below. Levee it as is and click ‘Install’ to continue.

Make sure all other applications running on your computer have been exited and let click ‘Yes’ as below to reboot your computer.

Once the computer has re started, you can then create a profile and configure the connection.
Configure your ‘Smart VPN Client‘ on your PC.
Now that the ‘Smart VPN Client’ is installed on your computer, you can run it and enter your credentials to make the connection. On your computer, click
the start button and select the ‘Smart VPN Client’ as shown below.

As this is the first time the ‘Smart VPN Client’ has been run, we will need to configure a new profile.

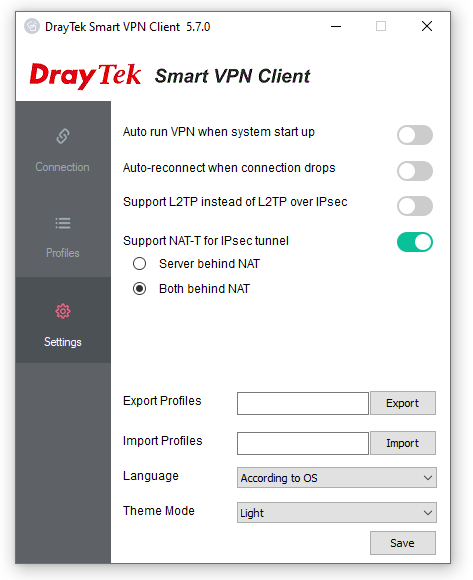
Select ‘Settings’ on the left and make any appropriate changes. In this case, none are needed so we will levee them as they are. If you make any changes, select ‘Save’ to save them.
Next Select ‘Profile’ on the left and create a new profile. Profiles are used to connect your computer to different VPN’s.
Enter the IP or Hostname, User Name and Password you would have been given from your IP person and click ‘OK’.
Please note: we may also use port :444 instead of port :443.

Verifying your connection
Open an explorer window and enter the IP of the server you wish – in this example the IP of the server is 192.168.0.65 You may also enter the servers name eg ‘\\fileserver‘.

After hitting ‘Enter’, you should be prompted to enter the logon username and password used to connect you to the remote server.
Once you click ‘Next’ you should have the same level of access your server as you would from your computer as if it was in the office as you. The performance may be a bit to a lot slower though.